
Analytics is one of the most powerful tools you have to make sense of your users’ behavior. However, staring at numbers day after day can get tiring, and figuring out what metrics to keep an eye on isn’t always easy. That’s where WordPress heatmaps come in.
Heatmaps offer you a simple way to track and analyze what’s happening on your site. They do this by providing a visual overview of which areas of your website get more attention from users. With that information in hand, you can identify and fix problem areas quickly.
In this article, we’ll dig into what WordPress heatmaps are and what makes them so useful. Then we’ll teach you how to set them up using the heatmap for WordPress plugin. Let’s get started!
What heatmaps are (and why they’re so useful)
A heatmap is a visual representation of data that uses colors to represent specific values.
If you use a heatmap to analyze a page of your website, for example, it will show you which areas are receiving the most user interactions (such as clicks). The “warmer” the color, the more engagement a section gets:
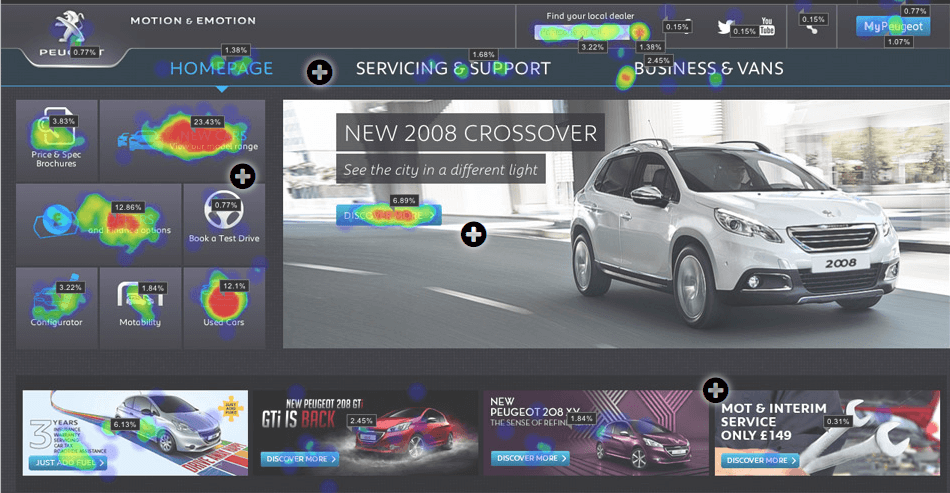
Red sections are the areas that get the most user attention on your site.
Heatmaps can be powerful tools for spotting issues (in design or otherwise), which means you get the chance to fix problem areas on your site swiftly. Here are a couple of examples of how you might use a heatmap to improve your site:
- You can determine if your Calls to Action (CTAs) are getting enough attention compared to other elements on your pages. If they aren’t, you can always take steps to make your CTAs more compelling.
- Under normal circumstances, your navigation menu should always be a ‘hot’ area. If that isn’t the case, you should probably look into improving your navigation.
As you can see, the real value of heatmaps lies in their ability to reveal specific issues with your design or navigation.
Before we move on, it’s worth noting there are two main types of heatmaps: those that track clicks, and those that analyze scrolling behavior. The first type is the most popular, since it provides you with more precise information about what your users are interested in clicking on. Scrolling heatmaps, on the other hand, are useful if you want a bird’s eye view of your site’s performance. They show you what areas are catching your readers’ eyes as they scroll down each page.
In the steps below, we’ll be focusing on a click heatmap tool for WordPress. However, you can always opt for an alternative such as CrazyEgg if you’re looking for a scrolling map.
How to set up WordPress heatmaps (in two easy steps)
For this tutorial, we’re going to use the “heatmap for WordPress” plugin. It’s one of the simplest heatmap tools available, and it comes with plenty of features.

Heatmap for WordPress enables you to monitor activity on your site as it occurs and see how it changes between mobile and desktop users. It’s simple to set up, and you can get a free plan that supports up to five pages on a single site and an almost unlimited number of interactions. If you’re looking to use the plugin on multiple sites, there are also premium plans available.
Before you can configure the plugin, you’ll need to install and activate it. Then proceed to the first step.
Step #1: Sign up for a heatmap account and activate the plugin
After you’ve installed the plugin, visit the new heatmap tab on your dashboard. You’ll see that it requires you to sign up for an account on heatmap.me before you can access its full features. Go ahead and do that now:

The only caveat is that you’ll need either a Google or a Facebook account to sign up. Don’t worry though – once you’re done setting up your account, you’ll be able to track your WordPress heatmaps from inside your WordPress dashboard.
After completing the initial signup process, heatmap.me will ask you for your WordPress site’s URL. Make sure you enter it correctly:

Fill out the necessary fields and save your changes. Then, go back to WordPress and click on the heatmap tab again. Select the Check now button, and the plugin should be ready to go.
Step #2: Track your user activity with your new heatmap tool
You don’t need to worry about your WordPress heatmaps being difficult to use – heatmap for WordPress makes accessing them remarkably simple. All you have to do is find the page you want to track and make sure you’re logged into WordPress. If you are, you’ll see a new heatmap icon on your admin bar:
![]()
Simply click on that icon, and you’ll see colors popping up all over your content. Of course, if you just recently set up the plugin, you’ll need to wait for a while until visitors have had time to interact with your site. For now, just sit back and let the plugin work its magic!
Conclusion
Heatmaps have been around for a while, but they aren’t the kind of tool you see talked about often. That’s a shame because they offer a very simple way to analyze what’s happening on your site. Using a heatmap will help you discover which areas users like and which aren’t getting enough traction. That information is worth its weight in gold.
All you have to do is install the “heatmap for WordPress” plugin, sign up for a heatmap account and connect it to your site, and you’ll be able to access your new tool.
Do you have any questions about how to install and use WordPress heatmaps? Pick our brains in the comments section below!


Or start the conversation in our Facebook group for WordPress professionals. Find answers, share tips, and get help from other WordPress experts. Join now (it’s free)!