Catching the interest of your visitors is a tough endeavor, but nowhere near as difficult as keeping them on board for the long term. One of the newer ways to succeed in doing so is to figure out the best ways to reach users outside your website – hence the need to consider adding WordPress push notifications.
WordPress push notifications enable you to set up a direct line of communication with your audience.
They’re far more straightforward than emails and are more engaging than regular campaigns [1]. If you learn how to deploy them, they can become a huge boon to your site.
In this article, we’ll explain why WordPress push notifications are so useful. Then, we’ll guide you through the process of setting them up on your site using the free OneSignal plugin. Let’s get cracking!
What are push notifications (and why should you use them)? 🤔
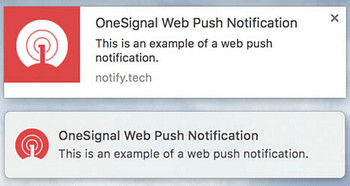
WordPress push notifications are simple to understand and put in place. If you’ve used either Android or iOS, you’re familiar with apps sending you notifications even when they’re closed – those are push notifications. Websites can do the same thing even if you’re not browsing them at the moment, as long as you’ve got your browser running. Here’s what a desktop notification looks like on Mac OS X:
Push notifications can come in handy in several situations, like:
- Notifying users about new posts on your website.
- Letting subscribers know when you add a new product to your eCommerce site.
- Making significant announcements – concerning events and such – to your user base.
Aside from these types of practical reasons, it’s worth noting that push notifications are a great tool to increase user engagement [2]. The key is to update them only concerning important stuff, so they won’t start ignoring your notifications. Don’t think about push notifications as a replacement for email lists or social media channels. They’re simply another means of direct contact, with the added benefit of being able to provide real-time updates to your visitors.
How to set up WordPress push notifications in 3 steps 💡
Before we jump into the technical stuff, it’s important that you back up your WordPress site. You should always do this before adding (or removing) any major features from your website, in case something goes wrong. In fact, you should be doing it regularly, even if you don’t implement any significant changes. Check out our guide on how to back up WordPress with several options.
For the purposes of this tutorial, we’ll use the OneSignal plugin to set up WordPress push notifications. It’s not the only option out there, but it’s one of our favorites. If you’d prefer to check out an alternative, take a look at the Push Notifications for WordPress plugin.
- Step #1: Set up the OneSignal plugin
- Step #2: Configure automatic notifications
- Step #3: Add a notification opt-in
Step #1: Set up the OneSignal plugin

OneSignal is a one-stop solution for WordPress push notifications. It supports both desktop clients (Chrome, Safari, and Firefox) and Android systems (there’s no iOS support yet). Once enabled, your visitors can opt-in to receive notifications each time you publish a new post (or custom post types) through the WordPress editor or a third-party platform.
The first thing we need to do is install and activate the plugin as per usual:

When that’s done, a OneSignal Push tab will appear on your WordPress dashboard. Click on it, and you’ll be redirected to a setup tab to finish configuring the plugin. Read through the Overview and then head to the Chrome & Firefox Push tab:

The plugin includes step by step instructions (with screenshots) for adding both services, so it would be redundant to repeat them here. Follow the procedures for Chrome and Firefox, and then head to the Safari Push tab if you want to add those notifications as well. Safari notifications only work on the macOS version, though, so keep that in mind.
With that out of the way, let’s go about adding WordPress push notifications to our website.
Step #2: Configure automatic notifications
As I mentioned earlier, OneSignal WordPress push notifications only appear when you publish new content to your site. That includes both regular posts and custom post types. The plugin enables you to set up notifications manually by ticking a box next to the WordPress editor on your posts:

If you’d rather automate this process, go to OneSignal Push > Configuration on your WordPress dashboard. Now scroll down and locate the Automatic Notification Settings section.

Turn on the first option, as seen above, et voilà. Your subscribers will automatically receive notifications each time you publish a new post. You can also replace the default OneSignal logo on the notifications with your post’s featured images, by heading up to the Sent Notification Settings section:

Enable the corresponding option, and you’re all set!
Now it’s time to configure an opt-in for our notifications.
Step #3: Add a notification opt-in
Our WordPress push notifications are ready to go, but we’ve still got one step to complete. Before users start receiving notifications, they need to agree or opt into the program (hence the term ‘opt-in‘). Here what a OneSignal opt-in looks like on Safari:

To do this, let’s return to OneSignal Push > Configuration. Inside, locate the Prompt Settings & Notify Button section:

The setting we need to turn on is first on the list: Automatically prompt new site visitors to subscribe to push notifications. Do so and then feel free to play around with the rest of the settings next to it. The Notify button option, for example, enables a small notification button in the bottom right corner of your site, which enables users to check recent notifications.
Final thoughts on WordPress push notifications 💭
WordPress push notifications are an effective tool that can increase your site’s engagement with little effort.
As long as you keep producing quality content, it stands to reason that users will be interested in checking it out – all you’re doing is providing them with the occasional reminder to do so.
If that sounds like a winning formula to you, here are the steps you need to know to add WordPress push notifications to your site:
- Install the OneSignal plugin.
- Configure automatic notifications using the plugin.
- Set up a notification opt-in for your visitors.


Or start the conversation in our Facebook group for WordPress professionals. Find answers, share tips, and get help from other WordPress experts. Join now (it’s free)!