When you assign posts to specific categories, it adds more structure to your content. Plus, it makes it easy for visitors to find the content they want and improves your site’s overall SEO. However, you might not know how to add categories in WordPress.
Fortunately, it’s relatively simple to create categories and assign them to your WordPress posts. Better yet, you can even add subcategories to implement a greater degree of organization.
In this tutorial, we’ll take a closer look at categories and differentiate them from WordPress tags. Then, we’ll show you how to add categories in WordPress. Let’s jump right in! 🦘
What are WordPress categories?
Categories provide an easy way to sort and organize your content. Plus, they help you achieve a better site structure, which helps search engines understand your content. As such, you can assign categories to your posts to gain higher rankings in the search results.
Categories help you organize your posts around specific topics. So, you might have a “News” topic reserved for posts that deal with current events or trends. Meanwhile, you might have a “Tutorial” category where you guide readers through detailed step-by-step instructions.
However, it’s very easy to mix up categories with tags. While both are classified as WordPress taxonomies, categories are used for a broader grouping of posts, while tags are more specific and can be used to describe different aspects of a post. Plus, you can create hierarchies by including subcategories:
Meanwhile, WordPress requires you to assign categories to posts (but not tags). If you don’t set up your own categories, WordPress will assign your content to a default category, often labeled “Uncategorized.”
As we’ve mentioned, you can also create child categories (or subcategories) to add more structure to your site. So, if you run a travel blog, you might file your posts under categories based on destinations.
While the parent category may be the country, you can set up child categories for different places within the country. So, “United States” may be the category, and “Chicago” may be the subcategory.
How to add categories (and subcategories) in WordPress
Now that you know a bit more about categories, we’re going to show you how to add categories in WordPress.
- Create categories in WordPress
- Add subcategories in WordPress
- Assign WordPress posts to categories and subcategories
1. Create categories in WordPress
If you’re wondering how to add categories in WordPress, you’ll first need to create some categories for your content. You can do this by going to Posts > Categories from your dashboard:

Here, you can give your category a name and choose a relevant slug. You can also add a description for your category, but some themes may not show this.
It’s also a good idea to change the Uncategorized option that WordPress provides by default. To do this, hover over Uncategorized and click on Edit:

Then, simply change the details to set up a relevant category on your site.
2. Add subcategories in WordPress
As we’ve discussed, you can also create subcategories that organize your posts into more specific topics. This tends to be a good idea if you have lots of content on your site.
To set up subcategories, return to the Categories screen and give the category a name and slug. The only difference here is that you’ll need to use the Parent Category dropdown menu to assign your subcategory to the broader parent category:

For example, you might want to list a destination beneath the Travel category to better organize your posts. Once you’ve entered the details, click on Add New Category.
Now, you should see the child category appear beneath the parent category in the column to the right:

Continue with the process to add more subcategories to WordPress.
3. Assign WordPress posts to categories and subcategories
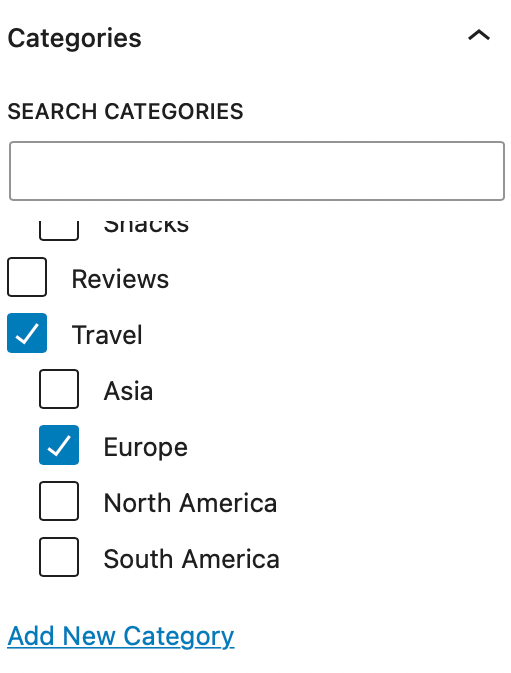
Now that you know how to add categories in WordPress, you’re ready to assign categories to your posts. In the WordPress editor, you’ll need to expand the Categories tab:

Here, you can see all the categories and subcategories that you created in the previous steps. So, to assign your posts to categories, simply check the relevant box(es).
You can also create new categories here. To do this, click on the Add New Category link. Then, enter the category name and leave the Parent Category dropdown as it is if you want to create a new parent category:

Otherwise, use the dropdown to select the parent category that you want to assign your subcategory to. Then, click on Add New Category.
How to optimize categories in WordPress for SEO

Now that you know how to add categories in WordPress, you can optimize categories to improve SEO on your site. One of the easiest ways to do this is to include keywords within your slug.
You can use a keyword tool like Google Keyword Planner to find keywords that real users are searching for. Then, simply include some terms or phrases in the slug(s) on your Category page:

Better yet, WordPress even lets you change the category prefix of your URLs. To do this, go to Settings > Permalinks. Then, scroll down to Category base:

Now, enter the prefix you want to use and click on Save Changes.
To further optimize your WordPress categories, you might want to install an SEO plugin like Yoast SEO. This way, you can change the default way that WordPress handles categories, which can sometimes have a negative impact on SEO.
With the plugin installed, go to Yoast SEO from your dashboard and click on Settings. Then, select Categories:

Here, find the Search appearance section and disable the Show categories in search results setting:

This will stop Google from indexing your category listings which helps avoid problems like duplicate content.
Conclusion 🧐
By assigning categories to your WordPress posts, you can improve the structure and organization of your content. This can help improve SEO since search engines are able to better understand your site.
Plus, it enables readers to quickly find what they’re looking for.
👨💻 To recap, here’s how to add categories in WordPress:
- Create categories in WordPress.
- Add subcategories in WordPress.
- Assign WordPress posts to categories and subcategories.
Do you have any questions about how to add categories in WordPress? Let us know in the comments below!


Or start the conversation in our Facebook group for WordPress professionals. Find answers, share tips, and get help from other WordPress experts. Join now (it’s free)!